So, last year I bought a Stargate Pinball Machine in pretty sorry shape. The Plastics were dull and scratched and the playfield (in-fact the entire game) was incredibly dirty and needed some minor repairs. This was clearly a machine which had been in an operators’ possession its entire life (I purchased it from an operator) and they are not known for keeping machines in top shape. Cabinet was in great shape and the game was complete with MOST of it working (uncommon for this machine) and I could tell how to fix the issues so I got it for a good price.
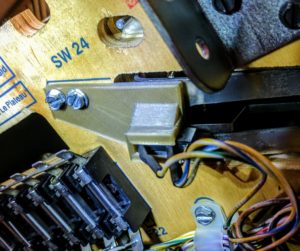
 The Bracket for the ball trough switch was partially broken causing games to not be playable, but finally gave up the ghost. It was designed by the Village Idiot, clearly. A switch that gets banged on all the time and its got a beefy bracket with only two small plastic pegs holding the actual switch with two C-clips holding it in. Apparently, this breaks on almost every Gottlieb System 3 Machine and people Jerry Rig it with tape.
http://www.thingiverse.com/thing:2042367
So, I redesigned it so it would be much stronger and the switch serviced without requiring any desoldering. You can download it for your game Here: http://www.thingiverse.com/thing:2042367
Before:
After fixing the sensors and other issues with the game, it was time to Fully LED this sucker! After LEDs and Playfield restoration .

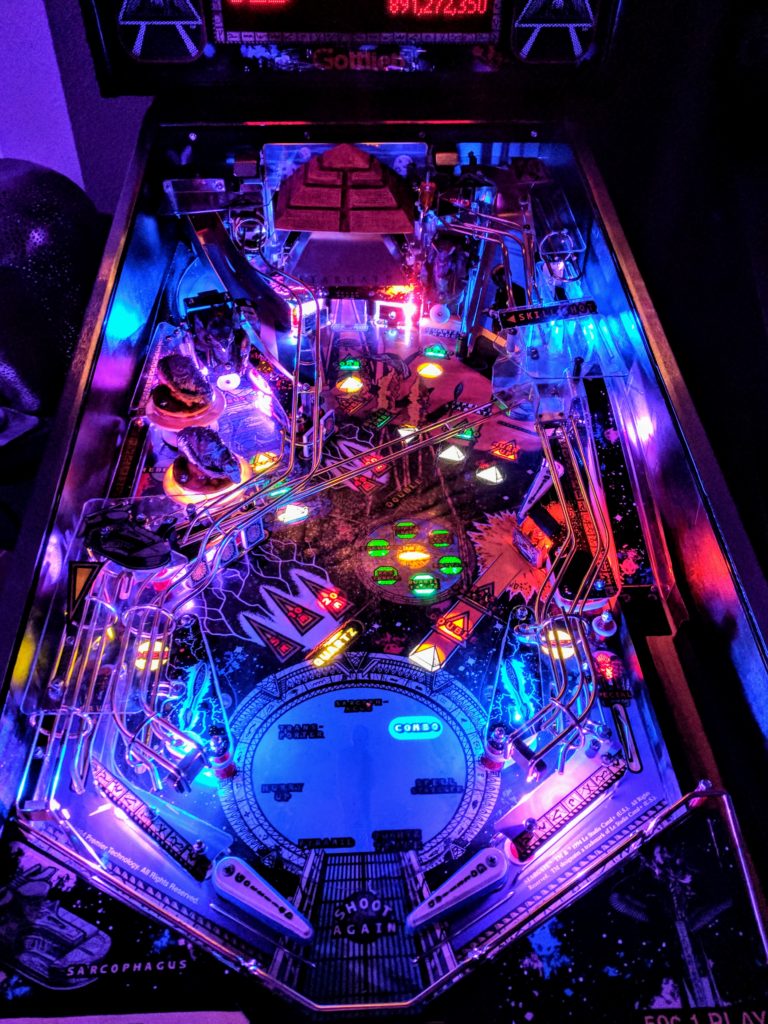
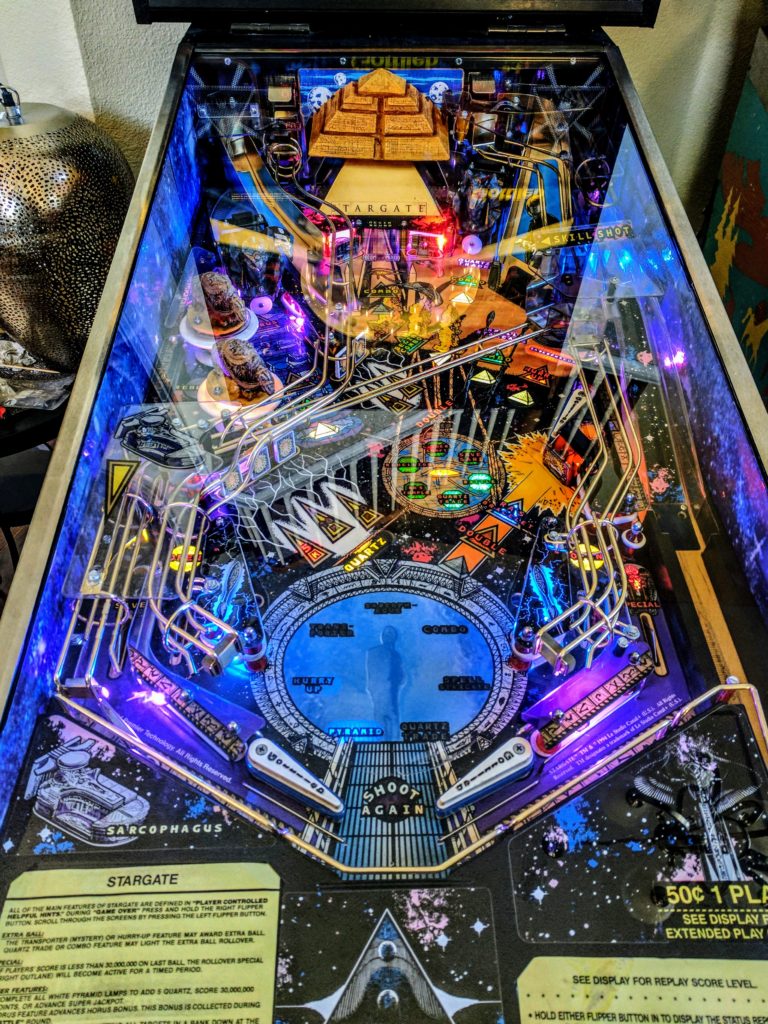
That is a Daytime pic above and it is BRIGHT! This game is known for being dark and sad and yellow. Colored ultrabright LEDs really make it stand out, but I still was not entirely happy with the playfield look. Now, there is a vendor who sells something called PinBlades of a Galaxy-type look, but they only cover the sides, cost $100 shipped, and have an identical design on both sides that I did not love. So, I made my own from 3M Car-covering Vinyl custom printed for me in a 150cm x 50cm roll for ~$15 shipped from China. One Roll is PLENTY to vinyl the inside and the entire backside. This is a 2 person operation and does NOT require that you do anything more than lift the playfield. The result is far better than the ones sold for $100 and the durability is far higher (complete with extra glossy finish). It looks like you are staring into a Diorama!

4 Comments
Dax Kuehn · October 17, 2019 at 5:31 PM
Seriously LOVE what you’ve done with this machine! I just picked up a Stargate as well…an chance you’d be able to tell me where you got the custom 3M car vinyl printed? Did a quick search on Alibaba, etc but couldn’t find anything right off the bat.
Thanks,
Dax
A.J. Hodges · May 26, 2020 at 6:42 PM
Did you just do a yellow to green bulb swap on the lights around the eye of Ra or is your play field different? Mine is yellow all yellow like the eye in the middle.
Would I be able to get a link of the art you used to have you own pin blade made?
I just bought my first pin (Stargate) and i’m looking to do some of the work my self such as powder coating rails and and do an LED swap. Do you have a recommended led kit? Your pin is beautiful
Thank you!
childofthehorn · October 29, 2020 at 3:37 PM
It’s Green LEDs that I got in there which specifically don’t turn all the way off. I just didn’t like how much yellow there was. You can fix them to not show a bit by putting in a resistor pretty easily.
Stargate Pinball Reactive LED Ring Mod/Hack! – Stacy Devino · April 2, 2017 at 4:22 AM
[…] If you want to see more of the whole process of fixing, restoring and customizing this Stargate Pinball machine, you can look at my post on the subject here : https://www.stacydevino.com/2017/04/fixing-and-restoring-a-stargate-pinball-machine-with-3d-print… […]